There are a couple of things I’ve learned over the past few years that I honestly never would have thought of nor realized if it weren’t for this wonderful thing we call the internet. They aren’t really important things, not for the most part, but I thought I’d share them with you just the same.
- The internet taught me that not everyone who CAN make a website SHOULD. Yellow text is just never acceptable.
- Pinterest taught me that there are a shit ton of alfredo chicken pasta recipes & enchilada recipes- everyone’s husband LOVES them & all of them are “top rated”! (are they really, though?)
- Pinterest also taught me most people do not buy Ball® jars to preserve food. Silly me.
- Facebook has taught me the most unattractive people love to post the most photos of themselves. Usually in “da club.” Usually drinking. Usually wearing inappropriate clothing for their weight/age/etc.
- Facebook also taught me that people who didn’t like me in HS want to be my friend now, after not seeing or speaking to me for 13 years. Strange isn’t it?
- Instagram taught me I really, really, really love to see what other people are eating & drinking. Maybe too much.
- Instagram also taught me that there are chicks who do that “duck face” thing seriously, not joking. Woops.
- Twitter has taught me that I like people better when they’re limited to only 140 characters.
- Twitter also taught me that people still prefer to follow rather than lead. (whoa- DEEP THOUGHTS)
- Blogs taught me that everyone thinks they’re funny, clever, and either a professional photographer, makeup artist or chef.
- Blogs also taught me that most of them are none of the above.
But one of the most important things I’ve learned- aside from the fact that there are a lot of really cool people out there, who sadly, do not live anywhere near me- is that anything you want to do, or things you’ve never dreamed of doing (particularly involving the re-use of every day household items)… the instructions on how to do these things are all right at your fingertips.
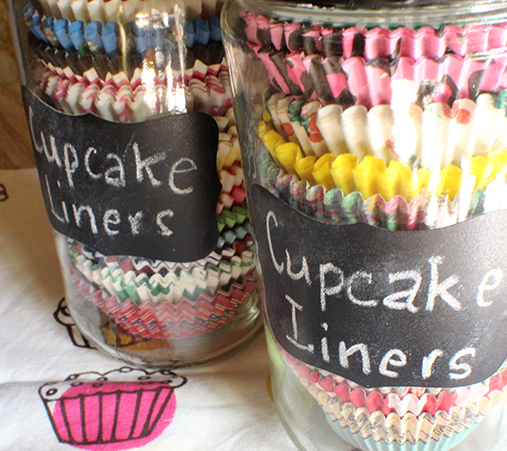
And so I made these.
 My chalkboard-writing skills only apply to larger pieces… obviously…
I have a problem with pretty cupcake liners. I always have, really, but before I baked it wasn’t as big of an issue. Before I baked, I’d see them in a store & say “Oh how cute!” then I’d promptly pass them by and pick up a frozen pizza & a bag of Totino’s pizza rolls. But once I started using them it became a thing. I bought so many I had nowhere to actually put them. For awhile, I had some out on a few cupcake & cake stands, but they were getting dirty & dusty from being in the middle of all that kitchen-witchery. So then I bought plastic shoeboxes at Bed Bath & Beyond. And I filled those up real quick, but they got overloaded and in the process began crinkling & eventually ruining the shape of my beautiful liners. Wahhh.
What’s a girl to do?
(Psst… I’m sharing this with you because if you’re here reading this, you might very well have the same problem.)
So one day I was browsing Pinterest, as one is wont to do, and I happened upon this. Genius. Why didn’t I think of that?
Well actually, I had, but I thought of it using Ball jars; and you see, based on what jars I had at my disposal I realized that regular mouth jars aren’t wide enough, and aside from that… pint jars are a bit too shallow and don’t hold as many as you’d like. But this time it just so happens that when I saw that pin, I had literally just finished cleaning out & de-labeling two 25 oz. Victoria pasta sauce jars. And as I scrubbed them I was wondering what exactly I was going to use them for. I had already made candy jars out of old sauce jars, so I didn’t want to do that again (a girl can only have so many candy jars).

And so there I am, washing these jars & seeing this pin on Pinterest. And like I said, I had all these pretty liners… all wasted by being hidden away… it just made sense. So I made some cupcake liner storage jars out of ’em! The Victoria jars are the PERFECT SIZE for this. Basically, you need a jar with a mouth opening of around 3″ in order to accommodate the liners comfortably. And it should be a pint & a half at least in order to make it worthwhile- you really can’t fit many in a pint jar. It just so happens the Victoria jars are 6″ high (not including lid) with a 3″ wide mouth. Wide mouth quart-sized Ball or Kerr jars would probably work as well.
The thing with these is that there really isn’t any “tutorial” involved- just get jars that the liners fit into without getting squished, and do whatever you want with them. I painted the lids with black Martha Stewart acrylic chalkboard paint (2 coats), and put chalkboard label stickers on the front. This way, if you wanted to split the liners according to holiday or color, use the labels or chalkboard lids to mark them; i.e. “Christmas”, “pink”, “stripes”, etc. The chalkboard paint comes in just about every color you can imagine, so you can match your appliances, your KitchenAid, your kitchen, you name it.
Done. Counter-ready, aesthetically pleasing cupcake liner storage, at your service!
*And if you wanna make some more “Pinterest Projects”, head on over to textdrivebys.com and check out my other DIY posts.
![]()

 I'm Marilla. A 30-something artist, hobby baker, home canning enthusiast, gardener, DIY-er, wife, mommy of a baby boy and dog mom (to another baby boy) from New York.


Total genius!!! Now my cupcake liners won’t be all over the cabinet, fall behind the fridge, and stay out of the reach of a certain 3 year old who thinks it’s fun to put water in them 😛
I had that same problem before I put them in the shoeboxes; they were all over in my cabinet, falling out all over the place. I can relate!
Such a great idea!
I wish I could say I thought of it, but I’ll take the compliment 😀
Pretty great post. I just stumbled upon your blog and
wanted to mention that I’ve truly loved surfing around your blog posts.
In any case I will be subscribing in your rss feed and I’m hoping you write again very soon!
I pay a visit day-to-day a few web pages and information sites to read content, except this weblog provides quality based articles.
Thanks for the auspicious writeup. It if truth be told was once a entertainment account it.
Look complex to far added agreeable from you! However, how could we
keep up a correspondence?
Hi there it’s me, I am also visiting this site regularly, this
site is really good and the visitors are actually sharing good thoughts.
Magnificent goods from you, man. I have understand your stuff previous to and you’re just extremely great.
I really like what you have acquired here, certainly like what you are stating and the way in which you say it.
You make it enjoyable and you still care for to keep it sensible.
I can not wait to read far more from you. This is actually a wonderful web site.
Loving the info on this site, you have done outstanding job on the articles.
What’s up everyone, it’s my first visit at this website, and post
is in fact fruitful designed for me, keep up posting these types of
articles.
Hello! Someone in my Facebook group shared this site with us so I came to
take a look. I’m definitely loving the information. I’m
book-marking and will be tweeting this to my followers!
Outstanding blog and fantastic design and style.
Everything is very open with a clear explanation of the challenges.
It was truly informative. Your site is very helpful.
Many thanks for sharing!
I love what you guys are usually up too. Such clever
work and coverage! Keep up the amazing works guys I’ve included
you guys to blogroll.
What a information of un-ambiguity and preserveness of precious experience concerning unpredicted emotions.
Hey there! Would you mind if I share your blog with my twitter group?
There’s a lot of people that I think would really enjoy your
content. Please let me know. Thank you
Hello, I desire to subscribe for this website to get most recent
updates, therefore where can i do it please assist.
That is a great tip particularly to those fresh to the blogosphere.
Simple but very precise info… Appreciate your sharing this one.
A must read post!
Very rapidly this web site will be famous among all blogging viewers, due to it’s nice posts
I like the helpful info you provide for your articles.
I will bookmark your blog and check again here regularly.
I’m fairly sure I will be told lots of new stuff proper here!
Good luck for the next!
Tremendous issues here. I am very glad to peer your article.
Thank you a lot and I am taking a look forward to contact you.
Will you please drop me a mail?
Hello, I log on to your blogs like every week. Your writing style is witty, keep
doing what you’re doing!