
As you might remember, I love gardening. Every summer I typically do container gardens. Not for lack of gardening space, but because the best spots were taken by other things, and I never had the time nor frame of mind to really tear down and build up, so to speak. I do love container gardens for many reasons, and a raised garden bed is pretty much just a big ol’ container garden!
But this year a few events worked in our favor & some great spots were open. So my woodworker Jay decided to finally build me some raised garden beds! What a great early birthday gift. And it turns out, it’s actually a super easy DIY project that you can make in one weekend.
First off, the area should be completely void of grass, flowers, bushes, roots, or trees. We had a fence put up, and three trees and over 20 bushes and shrubs that were overgrown/unwanted were removed professionally, so we had a LOT of clear area to work with!

See? That’s three trees. Piled up in my yard for firewood. I’m not lying when I tell you we had a lot of greenery removed. Anyway, because of that, we had a lot of wide open areas by the new fence that got sunlight now. I’d suggest finding the perfect spot and keeping an eye on it from sun-up (or shortly after) until sundown. Make sure it gets 6-8 hours of sun a day or that you get at least a varying sun/shade period over the course of the day. If you’re not like us, and lucky enough to have your area cleared out by a pro, then clear it out yourself. Remove anything you don’t want/that might interfere. Trim tree branches so the sun can reach the spot. Pull out any grass/weeds/flowers. Rake up and till the soil thoroughly. Measure out the size you want before removing anything, and if you’re unsure you can always use sticks and string to “fake it” to see if that’s the final placement you want. Keep it there a day or two, watch the sunlight it gets, and see how you like it. When it’s a go then you’re ready for the next step.
The first thing you need to do after that is buy your wood. We used a tutorial from Sunset.com and adapted it to suit us. The bed you see here is 4′ x 8.’ It’s laid out this way:

You can make yours smaller or longer or more square- it’s up to you. You’ll need to buy cedar to make it, though, because it’s tough, excellent for outdoor use, and of course, untreated… because this will be used for edible plants. No chemicals in my food!
We used:
- One 6-ft long cedar 4-by-4
- Six 8-ft long 1-by-6’s
- 32 3″ wood screws
We didn’t do the PVC piping or the hardware mesh, but that was just personal choice. The construction of this is very basic & simple. If you can measure and cut wood, you’re gonna be fine. Here’s the link to the tutorial for actually building it. The building took Jay less than ONE hour to do.

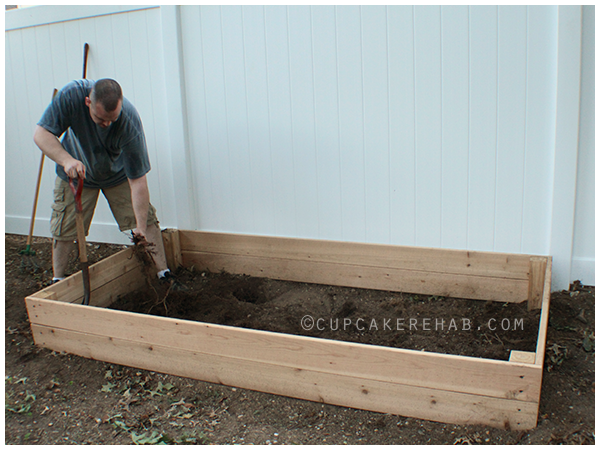
Once it’s built, then you’re ready to move it outside (unless you made it outside) and place it. Place it, double check, do any final adjustments and then dig your holes for the 4 posts.


This part was very easy. Then you just pop it in the holes and shovel the dirt back to fill any gaps.


ALMOST DONE!
Now we have to fill it with top soil. Because we had so many trees removed, and all the stumps were ground, we ended up with tons of wood mulch all over the place. We had to get rid of it, fully aerate and till the soil, remove any stray roots or leaves, and make sure it was broken up. It has to be easy to mix with the garden soil.

We used a combination of Vigoro organic garden soil/compost & Vigoro organic potting soil. It was fully in stock at the place we went to when we needed to buy the 22 bags of it, so that’s what we went with. Dr. Earth is also a good brand to use, as is Ocean Forest. We needed 32 cubic feet for the 4′ x 8′ bed. If you choose to alter the size, I’d recommend this calculator for figuring out how much you need to buy, however you can also figure it out manually using this formula:
Determine the volume of your planter box by multiplying the width by the length by the depth. For example, if you have a length of 5 feet, a width of 4 feet and a depth of 2 feet, the volume would be 40 cubic feet (5 x 4 x 2 = 40). This is the amount of dirt you will need to fill your raised planter box. This would equal 20 bags of soil sold in bags containing 2 cubic feet of dirt each.
And this seems to be the recommended percentage:
- 60% topsoil
- 30% compost
- 10% non-soil growing mix with vermiculite/perlite, etc
If you choose to use a garden mix/potting mix instead of topsoil as we did, you most likely don’t need to use the other two since most potting mixes have those things incorporated in them already. You can do that because technically a raised bed is a “container” garden, so potting soil is perfectly acceptable to use.
You mix 2-3″ of your new soil with your native soil. Thoroughly mix it in, using a spade or shovel if need be. Then continue filling it; after emptying each bag, smooth it out and rake it into an even level.
 (we did this a few days later, and it was getting dark, hence the bad photo)
Then, you plant your veggies & herbs! Mine were sitting around awhile waiting to be planted, but if you create this bed at the beginning of the season, you might have just seeds/seedlings to plant. All of mine were well established. We have 4 tomato varieties, 4 pepper varieties, 2 cucumber varieties, 2 broccoli varieties, cauliflower, “Fairytale” eggplant, and green beans. As far as herbs go we have sweet basil, cinnamon basil, rosemary, chives, lemon balm, dill, Italian oregano, cilantro, flat leaf parsley, chocolate mint & sweet mint.

And then you need to label them! I used Sharpies to draw on wood shims. They come in all sizes and are cheap. You can use paint stirrers, painted rocks, popsicle sticks, old silverware… just about anything if you’re creative! Or you can just use the seed packets themselves. A quick search on Pinterest gave me a ton of ideas. Get inventive with it… after all, you’re gonna be seeing them every day, might as well make them pretty.


After about a week, we debated adding the cedar fencing. I initially bought some because while we live in a suburban area not far from an urban area, there are a surprisingly large number of bunnies & squirrels around here! Even with the large vinyl fence around our yard, they might be curious and try to nibble. I love having them around but I don’t want them eating my tomatoes! I bought this fencing in rolls at Lowe’s. You could also make your own, or follow the directions in the original tutorial on Sunset.com for adding the netting on top of the bed. We haven’t added the fence yet, we’re still thinking about it.
I also tied a few metallic cellophane crinkly things to a tiny Shepherd’s hook in the middle to deter birds from eating any seeds; the metallic look blowing in the wind resembles fire to a bird, and they won’t go near it. I refuse to use pesticide or chemicals in any way, so these are cheap easy fixes to attempt to repel little critters. Aluminum foil works as well as metallic ribbons.
I kept my strawberries in a pot, separate. This is an Alpine variety that’s specifically not a “trailing” or runner berry- it’s called “Alexandria”, and the berries are perfect for jams/jellies/pies. We named them “Dotty’s Strawberries” because Grandma Dotty loved her strawberries & strawberry jam.


As far as bugs go, I use a mix of dishwashing detergent, vinegar and water and spray it on the plants when the sun goes down if I see any signs of pests. Dr. Bronner’s or Fels-Naptha can be diluted with water and used as well. Again, I don’t use chemicals on anything in my yard. For fertilizer I use crushed egg shells (they provide calcium & also deter slugs/snails, etc), Epsom salts (Magnesium Sulfate makes lush gardens- roses love it too!) & Dr. Earth Tomato, Vegetable & Herb fertilizer.

And that’s it! It’s ready to be harvested as soon as all those little buds grow into deliciously fresh edibles, which is very close to happening.
And of course, I’ll keep you updated via my Twitter, Instagram and Facebook pages!

I wanna see your gardens! So… show me on any social media account, or link me here in the comments.
![]()
SOURCES & CREDITS: Sunset.com for the original bed tutorial, Vigoro organic soil; Home Depot, cedar wood used for project; Lowe’s.

 I'm Marilla. A 30-something artist, hobby baker, home canning enthusiast, gardener, DIY-er, wife, mommy of a baby boy and dog mom (to another baby boy) from New York.


Fantastic items from you, man. I’ve be aware
your stuff prior to and you are simply extremely fantastic.
I really like what you’ve received right here, really like what you’re
stating and the way during which you are saying it.
You make it enjoyable and you still take care
of to keep it sensible. I can not wait to read far more from you.
That is really a great web site.
With havin so much written content do you ever run into any problems of plagorism
or copyright violation? My blog has a lot of completely unique content I’ve either created myself or outsourced but it seems a lot of it is popping it up all over
the web without my agreement. Do you know any methods to help prevent content from being ripped off?
I’d definitely appreciate it.
Fine way of describing, and good article to get information about my presentation subject matter, which i am going to convey in college.
Fantastic beat ! I wish to apprentice while you amend your web site, how can i
subscribe for a blog site? The account aided me a acceptable deal.
I had been tiny bit acquainted of this your broadcast provided bright clear idea
Some really interesting info, well written and
generally user friendly.
I really like your blog.. very nice colors & theme. Did you make this website yourself or did you hire someone to
do it for you? Plz reply as I’m looking to construct
my own blog and would like to find out where u got this
from. cheers
Howdy would you mind stating which blog platform you’re using?
I’m looking to start my own blog in the near future but I’m having a hard time selecting between BlogEngine/Wordpress/B2evolution and Drupal.
The reason I ask is because your design seems different then most blogs and I’m looking for
something unique. P.S My apologies for being off-topic but I had to ask!
Thanks very interesting blog!
If some one wishes expert view regarding running a blog afterward i advise him/her to
visit this webpage, Keep up the good work.
Hello just wanted to give you a brief heads up and let you know a few of the images aren’t loading correctly.
I’m not sure why but I think its a linking issue. I’ve tried it in two different web
browsers and both show the same results.
I have learn a few excellent stuff here.
Definitely price bookmarking for revisiting. I wonder how so
much effort you set to create this kind of wonderful informative
website.
I am actually happy to read this website posts which contains lots of helpful facts, thanks for providing these data.
I have been reading out a few of your articles and i must say pretty clever stuff.
I will surely bookmark your blog.
What’s up to every one, because I am actually keen of
reading this website’s post to be updated regularly. It carries fastidious stuff.
I drop a comment when I appreciate a post on a website or if I have something to
valuable to contribute to the discussion. It’s a result of the passion displayed
in the article I looked at. And after this article CUPCAKE REHAB | est.
2007. I was actually moved enough to post a leave a responsea response 😉 I actually
do have some questions for you if you don’t mind.
Is it just me or does it look like like some of the remarks come across like written by brain dead visitors?
😛 And, if you are posting at other social sites,
I would like to follow everything fresh you have to post.
Would you list every one of your shared sites like your twitter feed, Facebook page or linkedin profile?
Hello would you mind letting me know which webhost you’re working with?
I’ve loaded your blog in 3 different web browsers and
I must say this blog loads a lot faster then most.
Can you recommend a good hosting provider at a reasonable price?
Cheers, I appreciate it!
Definitely believe that which you stated. Your favorite reason appeared to be on the internet the simplest thing
to be aware of. I say to you, I definitely get annoyed while people consider
worries that they just do not know about. You managed to hit the nail upon the top and defined out the whole thing without having side-effects , people can take
a signal. Will probably be back to get more. Thanks
When some one searches for his essential thing, so he/she wants to be available that
in detail, thus that thing is maintained over here.
I wanted to create you the bit of note in order to give thanks as before for the great opinions you have contributed at this time.
It’s wonderfully open-handed with people like you to present without restraint what exactly many of us
would have made available as an electronic book to help with making some bucks on their own, notably considering that you
might well have tried it if you ever considered
necessary. Those strategies also acted to become a good way to comprehend other individuals have a similar passion like my
personal own to see way more related to this issue.
I am sure there are thousands of more pleasurable opportunities ahead for individuals that read through your site.
Everyone loves what you guys tend to be up too.
Such clever work and coverage! Keep up the superb works guys I’ve
added you guys to our blogroll.
You really make it seem so easy with your presentation but I find this matter to be really something which I think
I would never understand. It seems too complicated
and very broad for me. I am looking forward for your
next post, I’ll try to get the hang of it!
I do trust all the ideas you have introduced on your post.
They’re really convincing and will definitely work.
Still, the posts are too short for starters. May you please prolong them a bit from subsequent time?
Thanks for the post.
Thanks for finally talking about > CUPCAKE REHAB | est.
2007 < Loved it!
Hello! I could have sworn I’ve been to this blog before but after browsing through some of the
post I realized it’s new to me. Nonetheless, I’m
definitely happy I found it and I’ll be book-marking and checking back frequently!
Amazing blog! Is your theme custom made or did you download it from somewhere?
A design like yours with a few simple tweeks would
really make my blog stand out. Please let me know where you
got your theme. Thank you
Every weekend i used to visit this website, as i
wish for enjoyment, as this this website conations really nice funny data too.
I was curious if you ever thought of changing the page layout of your website?
Its very well written; I love what youve got to say.
But maybe you could a little more in the way of content so people could
connect with it better. Youve got an awful lot of text for only having one or
2 pictures. Maybe you could space it out better?
Simply wish to say your article is as astounding.
The clearness to your put up is simply cool and that i could suppose you are knowledgeable
on this subject. Well with your permission let me to seize
your feed to keep up to date with imminent post.
Thanks a million and please keep up the enjoyable work.