Happy April! I hope you all had a lovely holiday this past week, regardless of which one you celebrated. Or at the very least, I hope you had just an all-around pleasant week/weekend. I’m exhausted from this past month, so I’m desperately trying to catch my breath. But other than that… I had a great week, and a great holiday.
Before I begin this post, let me say this: I’m no bread expert. I’m no canning expert either, however, and yet I did a little tutorial on the basics of that last summer. But you know, I have made plenty of loaves, plenty of pizza crusts and plenty of yeast-based things to know the basics. Enough to know a thing or two about it. All that said, I’m not a professional breadmaker. I’m not even an every day or every week breadmaker. I make bread whenever I feel like it, and I haven’t done an obscene amount of research beyond what I need to know. That said, I do know enough to ensure that my bread always rises and is never gummy or too tough. I know enough to always use fresh yeast- when in doubt, throw it out. And I also have some experience with starters. Also known as “biga”, “mother dough”, “poolish” or “the thing that makes sourdough bread taste that way.” Starters are a bit more complex than just regular breadmaking, so I’ve done a bit more research into them.

![]()
Starters frighten some people. Understandable. They hear the words “fermentation,” “constant feeding” and “can explode in an airtight container” and they get turned off. Or they assume it’s too much work. And I don’t really blame them, because I was the same way. But I’ve said it before and I’ll say it again: things that you’re frightened by are rarely as scary as they seem in your mind. That goes for most things in life, including cooking or baking. A starter really isn’t all that hard, or scary, or dangerous. Yes they can “explode” if put in a container that’s sealed. But this is something that’s very easily circumvented and it really isn’t a big issue at all… especially if you pay attention or have a basic concept of science.
![]()
But that’s my point with this blog to begin with: everyone can bake.
![]()
Everyone can cook. Everyone can make bread. You don’t have to be a professional or come from a family of cooks- you just have to want to. You just have to have a desire to learn.
This is going to be a very long post with a lot of information. Let’s start (ha ha) with the history of starters, shall we?
A pre-ferment is a fermentation starter used in bread making, and is referred to as an indirect[1][2] method. It may also be called mother dough.
A pre-ferment and a longer fermentation in the bread-making process have several benefits: there is more time for yeast, enzyme and, if sourdough, bacterial actions on the starch and proteins in the dough; this in turn improves the keeping time of the baked bread, and it creates greater complexities of flavor. Though pre-ferments have declined in popularity as direct additions of yeast in bread recipes have streamlined the process on a commercial level, pre-ferments of various forms are widely used in artisanal bread recipes and formulas.
The common, but undocumented, origin given for the term poolish is that it was first used by Polish bakers around 1840, hence its name, and as a method was brought to France in the beginning of the 1920s. “Poolish” however is an old English version of “Polish”, whereas the term seems to be most used in France (where “polonais” is the word for “Polish”). Some nineteenth-century sources use the homonym “pouliche”, a French word that typically means a female foal.[15] With either spelling, the term only appears in French sources towards the last part of the nineteenth century. There is not currently any credible explanation for the origin of the term.
-Wikipedia
 This is no-knead sourdough bread, isn’t it pretty? Recipe is down further in this post.
![]()
Alrightly then. Interesting, correct? And now let’s find out what exactly is meant by “starter”:
Fermentation starters (called simply starters within the corresponding context) are preparations to assist the beginning of the fermentation process in preparation of various foods and fermented drinks. A starter culture is a microbiological culture which actually performs fermentation. These starters usually consist of a cultivation medium, such as grains, seeds, or nutrient liquids that have been well colonized by the microorganisms used for the fermentation.
These starters are formed using a specific cultivation medium and a specific mix of fungal and bacterial strains.[2][3]
Typical microorganisms used in starters include various bacteria and fungi (yeasts and molds):
Rhizopus, Aspergillus, Mucor, Amylomyces, Endomycopsis, Saccharomyces, Hansenula anomala,Lactobacillus, Acetobacter, etc. Various national cultures have various active ingredients in starters, and often involve mixed microflora.[2]
Industrial starters include various enzymes, in addition to microflora.[2]
A pre-ferment is easy to make and usually consists of a simple mixture of wheat flour, water, and a leavening agent (typically yeast). Two schools of thought exist regarding the inclusion of salt or sugar. They both act to inhibit or slow yeast growth, as determined by time to proof or rise,[16] so they are not usually included and instead are added to the final dough. Ultimately, the amounts of each ingredient, and when they are added, depend on pre-ferment and final-dough formulas.
When expressed as a bakers’ percentage, 50 parts of flour added to 50 parts of water or 1-to-1 is 100% hydration, and results in a relatively fluid pre-ferment. Stiffer doughs such as 50% hydration or 2-to-1, may also be used. After mixing it is allowed to ferment for a period of time, and then is added to the final dough as a substitute for or in addition to more yeast. There are distinctly different brew types of pre-ferments designed for computer-controlled bakeries that use a rather different series of ingredients, including oxidizers, needed for continuous dough-production processes.[17]
Fermentation is sometimes performed in a warm place, or a humidity- and temperature-controlled environment. Cooler-than-room or refrigeration temperatures decelerate growth and increase the time interval,[18] while slightly warmer temperatures accelerate growth and decrease the time interval. Too warm of a temperature slows growth, while even higher temperatures will kill the yeast. Death of the yeast cells occur in the range of 50–60 °C (122–140 °F).[19][20][21] When cooling a levain or sourdough pre-ferment, if the dough temperature drops below 10 °C (50 °F) it affects the culture and leads to the loss of a particular aroma in the baked bread.[14]
To allow room for the pre-ferment to rise, the ingredients are mixed in a container at least four or five times their volume. This is about the point in time when some process similarities of yeast pre-ferments to sourdough or levain starters begins to diverge. The typical amounts of time allotted for the yeast pre-ferment period may range from 2–16 hours, depending on the dough’s temperature and the added amount of viable yeast, often expressed as a bakers’ percentage. Spontaneous sourdough starters take, at a minimum, several days, and are subject to many variables.[3]
To make a sourdough starter from scratch, the minimum-needed ingredients are flour, water, and time. This starter is maintained with daily feedings or refreshments of fresh flour and water or, new dough. It ferments at room temperature until the desired age or minimal number of refreshments, following a refreshment schedule that may include acceleration of time intervals leading into the final dough, then is added to the final dough. When maintaining a starter’s existing weight, it is advised to discard 60% (or more) of the starter, replacing that discarded dough with new dough. If an increased amount of starter is required, simply add new dough. 40-parts-to-60-parts of old-dough-to-new-dough by weight, or 2-to-3, is known as the back-slopping ratio, and changes to that ratio change the pH of the just-refreshed dough.[8] To make a primary-culture levain, Calvel used salt, but less of it than would be typical for many final-dough formulas.[note 3]
-Wikipedia
Yes, it’s a lot to read. But honestly, if you’re going to make something, you should know how and why you’re doing it that way, don’t you think?
![]()
At any rate, starters sound very complex, but they really aren’t. Usually they consist of three-four inital ingredients, a fermentation period, feedings, and then refrigeration. Some use a bit of the original dough. Some are thick and some are liquidy. But they all do the same basic thing; add flavor. And all you have to do is keep it warm when it needs to be, and keep it fed and refrigerated when it needs to be. It’s not hard, and it’s not at all easy to screw up. Most starters are incredibly strong & tough– even if you forget to feed them for a while, you can usually get them going again with a little flour and water (equal parts), for example a 1/2 cup of each. The reason they can’t be sealed is because they’re fermenting; there are gases building up almost constantly in there. If you close it off airtight, there’s no where for the gas to go. Kind of like a shaken bottle of Coca-Cola.
(One thing to note before I continue: you shouldn’t have homemade yogurt & a starter going at the same time in the same room/area. They will contaminate each other. For real…)
The starter pictured above (at the top) was used to make the bread pictured above (& below), which is a sourdough no-knead bread with poppy seeds. I’m going to give you two starter recipes here, that one being the second. As a matter of fact, for that one you don’t even really need a recipe, since it’s usually equal parts water/flour with yeast. But I’m going to give you a guideline anyway. The first one I used to make Levain bread a few years ago, and it’s amazing. While it’s slightly more complicated than the second, it yields good results. It also lasted a very long time until I ultimately did kill it when my refrigerator died. Cue ‘Taps.’
The benefits of using a starter? Well, for one, that sourdough taste. Two, once you’ve got a starter you don’t have to worry about having yeast on hand, your starter is all you need to make bread or pizza crust rise. Of course, that is if you desire that flavor. And once you have that bread made, you can even save a small piece of it and use that as a new starter. Once you start using a mother dough you can experiment with how much of it or how strong or “alive” it needs to be for your enjoyment. Some people say that you should feed it once every 8 hours for the three days leading up to baking. Others say as long as it smells okay and has bubbles it’s good to go. I assume this is a matter of taste, as I’ve done both methods and can’t say I ever had a problem with the taste or the rise of my bread.

![]()
Neither of these starters are better than the other, they’re just different. Try whichever one you want to start with, and if you like it, keep it up. No need to mess with a good thing!
SOURDOUGH STARTER A
Ingredients:
- 3 packages active dry yeast
- 1 cup warm water ( 105-115° degrees F)
Starter feed:
- ¾ cup sugar
- 3 tablespoons instant potatoes
- 1 cup warm water (again, 105-115° degrees F)
Directions:
- To make the starter, mix the yeast and warm water in a small bowl. Put into a plastic container, seal, and refrigerate for 3-5 days.
- To make the starter feed, combine the sugar, potatoes, and water in a small bowl and stir into the starter. Cover loosely (to allow some of the pressure to escape as the gases build) and let stand at room temperature for 5-12 hours. The mixture will be bubbly.
- When ready, take out 1 cup to make bread and loosely cover the starter and return to the refrigerator. Feed again after 3-5 days. If not making bread after feeding the starter, take out 1 cup and discard it to avoid depleting the starter. NOTE: do not put the lid on tight.
![]()
SOURDOUGH STARTER B
Ingredients:
- 2 cups warm water
- 1 package active dry yeast
- 2 cups all-purpose flour
Directions:
- In a ceramic bowl, add warm water and yeast. Mix with wooden spoon until the yeast is dissolved.
- Stir in flour. Mix until smooth.
- Pour starter into a plastic container that is at least four times larger than the liquid amount of the starter. This is because the starter will expand. Cover with a cloth napkin or tea towel and hold in place with a rubber band.
- Set the starter in a warm spot for 5 days. Stir each day. Refrigerate and use as needed, at least once a week. Replenish every other day (aka “feed”) with equal amounts of water and flour (1/4 cup each is fine, even less works as long as it’s equal amounts). If you’re not baking, remember to throw out a cup every week to leave room. Again- DO NOT PUT THE LID ON TIGHT!
![]()
See, they’re not that hard.
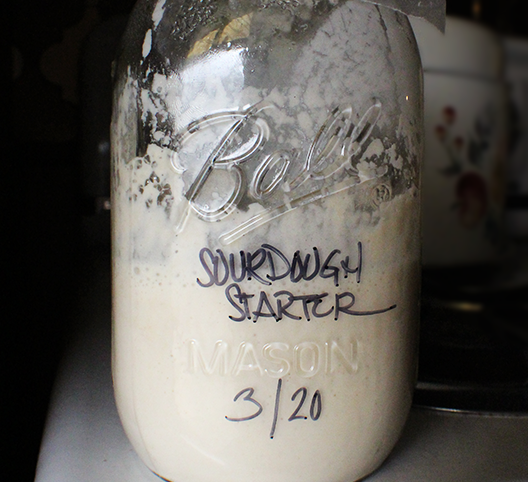
What I did this time was I halved the above recipe (B) and used a glass quart-sized Ball jar with a bit of waxed paper (with holes poked in it) held on with a rubber band on the top. I also labeled it because my fridge is filled with all kinds of concoctions in jars, like flavored milks, and you don’t want anyone to be half-awake and take a gulp of this. So far I’ve just used it in the following bread recipe, but I found it to do the job. If you find your bread isn’t quite sour enough, you can add a bit more starter next time, or do a refrigerator extended fermentation using the dough once it’s made… but that’s a whole ‘nother story! And funny enough, I just so happened to screw it up! I didn’t feed it enough during the initial 3-5 day initial fermentation period, and it had to begin to eat itself so to speak. It smelled of alcohol- straight alcohol, like I was brewing beer. Not a faint white wine-ish smell, a complete & total brewery smell. Like the smell of a freshly poured pint of Sam Adams lager. So I decided to ditch it & start over. There are ways of fixing it but I didn’t want to be bothered. On the whole, a faint vinegar smell & an alcohol smell are just fine during certain points in the starter-creation process. Even the development of “hooch”, a dark-colored or clear liquid alcohol that forms on top of your starter, is totally normal. Some people just stir it back in, others pour it off. Generally speaking, a starter goes through a variety of odors before its fully going. Unless it smells like rotten eggs, a bottle of beer or has mold on it, you’re probably okay.
 Double, double, toil and trouble… an active starter doing it’s thang
![]()
Also, just something to note: the firmer the starter, the more the acetic bacteria love it, and the wetter the starter the more the lactic bacteria love it. So if you’ve got a firmer starter, you’ll probably have more of an alcohol-y or vinegar-y smell than if you’ve got a really liquidy starter. And also, the firmer the starter, the more sour the bread will be.
You can only use a small amount like 1 tablespoon water/1tablespoon flour to feed the starter once it’s in the fridge & the growth slows. I’ve even gone days or weeks without feeding it and it’s still been alive & kickin’! However, if you feed it too little during the first few days of the fermentation period, you’ll get bad results. Take notes from my mistakes. Consistency during that time is key. And pretty much any container is fine- I’ve used Tupperware with plastic wrap & a rubber band on top, glass jars & Pyrex bowls. As long as it has room to grow & bubble it’s all good.
Note: different recipes will call for different amounts of your starter. Some will call for 2 cups, which might deplete or almost deplete your stash. That’s okay- just add more flour and water (EQUAL PARTS) and let it re-ferment, repeating the initial process. There’s no way to screw this up, I promise, unless you forget to feed it during the crucial first days, don’t feed it enough during those crucial first days or you make one & then your refrigerator dies in the height of a mid-September 95° F heat spell and you totally forget about it and it smells really weird & has a weird color growing on it by the time you get around to normal life again.
Not that I speak from experience or anything.
Also, make sure you feed your starter the day before you want to use it for baking. This is important, especially if you don’t feed your starter often or you’re forgetful. You want it all bubbly and alive when you use it so you get that really good flavor. I forget to do this sometimes and my bread turns out just fine, so don’t stress it, but if it’s been a LONG TIME since you’ve fed it, you might want to feed it once or twice before using it, just to make sure it’s healthy.
If you have any problems with your starter, I suggest checking this FAQ page. It’s got a lot of great information.
Now. Are you ready for a recipe to use up that smelly ol’ starter you just made? Good, ’cause here it is.
 Panera, eat your f*cking heart out.
![]()
SOURDOUGH NO-KNEAD BREAD (adapted from a recipe at Breadtopia)
Ingredients:
- 3 1/2 cups white bread flour
- 1 1/2 tsp. salt
- 1 1/2 cups water
- 1/4 cup starter
Directions:
- Mix together the dry ingredients, then mix in the water until the water is incorporated. You can use a wooden spoon or your hands, or even a stand mixer fitted with a dough hook on low speed if you must. Place the dough in a bowl coated lightly with olive oil and cover the dough with plastic. Let sit for 12-18 hours (I usually go with 10-12 hours, 18 is a bit much) at room temperature.
- Unwrap the dough and fold it over onto itself once or twice. Recover loosely with plastic and rest for 15 minutes. Transfer to well floured towel, and sprinkle with flour. Cover with another towel and let rise about 1 1/2 hours.
- Transfer to a 6-8 quart French or Dutch oven, or ceramic/Pyrex container with a lid that’s been preheated to 450-500° F degrees, and bake covered for 30 minutes (before baking I sprinkled mine with poppy seeds). Then, remove cover and bake an additional 15 minutes.
- Let cool completely on rack.
![]()
It’s really that easy.
I swear.
Now you can use that delicious sourdough bread for grilled cheese sandwiches. Trust me, it’s insanely good.
Some folks have a bit of a problem with using starters in their bread, they find the dough is maybe too wet and won’t hold a shape. As long as it’s a general roundish shape, and not a completely flat pancake that won’t rise at all, you’ll get bread from it. The wetter your dough the larger the air holes in it, which I happen to like, so I prefer to find a happy medium with a not-so-stiff dough that still holds it’s shape well. It’s all about experimenting and trying things, and I have to say I never had an issue that turned out to be an inedible bread! Most mistakes are still edible, if not perfect. But this way you’ll know that next time, you’ll have to add a bit more flour during the beginning stages. Like buttercream, bread dough isn’t always an exact science. Sometimes you need more milk or sugar in buttercream, sometimes you need more flour in bread dough. As long as you get a good rise in the oven, what’s known as an “oven spring”, then it doesn’t matter that the dough is too wet or too spongy or too dry. Here’s a bit more info about wet/liquid vs. firm/stiff starters.
And also, the type of flour you use and even the type of water you use can make a difference in your dough, so you might need more flour or less flour than a recipe calls for. It isn’t a big deal, trust me.

![]()
Like I said: the wetter the dough pre-baking, the bigger the holes in the finished bread. So if you always wondered how to achieve that, it’s a higher water content in the mix that causes a really wet dough.
Bottom line: anyone can make bread, and anyone can make sourdough bread using a starter! It’s NOT that difficult. If you’re interested in making yeast-based bread, and/or experimenting with starters in different kinds of bread, there are quite a few recipes I’ve posted over the years. From bagels to beignets, to cinnamon rolls to basic French bread and sourdough. Some require stand mixers, some don’t, some use starters, some don’t. You can find them all at the Recipe Index, under “Breads and Rolls (yeast).”
Experiment, enjoy… and good luck!
![]()

 I'm Marilla. A 30-something artist, hobby baker, home canning enthusiast, gardener, DIY-er, wife, mommy of a baby boy and dog mom (to another baby boy) from New York.


Yay bread! This looks so beautiful. I’ve been meaning to start baking sourdough for ages–but it’s hard when I have a friend who regularly gives me her second loaves of sourdough. 🙂 On the other hand, I definitely know where to go to get some established starter…
Mmm… sourdough bread is my favorite. And once you make it, you realize it isn’t that hard. I was so freaked out by my first starter! But it isn’t that hard. And if you get an already established starter… well… then half the battle is won!
After we get done moving this is going to be one of the first things I start! The smell of fresh baked Sourdough is one of the best things in the world. Hell the smell of fresh baked bread is! So this and my chcocolate snagria drunken fruit bread will be the first things done in our new place 🙂
Oh the smell of homemade bread is to die for!
Hi Marilla, so I just started the Starter B and I have a few questions. There’s a lot of info in this post so my apologies if I missed these. So after the initial 5 days of keeping the starter out, when do I give it the first “feed”. I know you said every other day but when does that start. Do I give it the first feed before I put it in the fridge? Also, after the five days, is it ready to use right away? Can I take the 1/4 c. and make bread or should it be in the fridge for a bit?
Also, for the recipe, you don’t mention when to put the starter in. You say mix the dry ingredients (which I’m assuming is the flour and salt) then you mix in the water. Is that when the starter goes in?
I’m super pumped to make my own bread! Thank you for the help and the post 🙂
Hi Erin!
Okay so I’d wait to feed the starter until it’s second day in the fridge. It’s ready to use that day, too, so I’d take out what I need and then feed it. I always try and feed my starter AFTER taking out what I need for bread.
And the starter goes into the bread right before the water, that’s my mistake. I’ll edit it right now!
Thank you for asking these questions… 🙂 Enjoy your bread.
thanks for your help, Marilla! My starter is awesome, the bread rose beautifully but when I baked it (on a cookie sheet with tin foil since I don’t have a dutch oven) the crust got dark and super crunchy while the inside stayed doughy. I definitely have some kinks to work out but the dough and starter seem good. Thank you again for your help!
Ahhh okay yeah thats the problem… I believe this recipe is suited for a French/Dutch oven. Try something like this: http://cupcakerehab.com/2011/04/youre-so-levain-you-probably-think-this-post-is-about-you/ (you can use any starter not just the one listed)
If you have better luck with that one, it was the pan 🙂 If not- TRY AGAIN!!
My brother recommended I might like this blog. He was totally right.
This post truly made my day. You can not imagine just how much time
I had spent for this info! Thanks!
I’ve been browsing online greater than three hours these
days, yet I never discovered any fascinating article like yours.
It is beautiful price enough for me. In my view, if all webmasters and
bloggers made just right content as you probably did, the internet can be much more
useful than ever before.
This is very interesting, You are a very skilled blogger.
I’ve joined your rss feed and look forward to seeking more of your
great post. Also, I’ve shared your web site in my
social networks!
I read this article fully regarding the difference of newest and preceding
technologies, it’s remarkable article.
Yay google is my world beater aided me to find this outstanding internet site!
It’s really a nice and useful piece of info. I am glad that you just shared this helpful information with us.
Please keep us up to date like this. Thanks for sharing.
Hello just wanted to give you a quick heads up.
The text in your post seem to be running off the screen in Ie.
I’m not sure if this is a formatting issue or something to do with web browser compatibility but
I thought I’d post to let you know. The style and design look great though!
Hope you get the issue solved soon. Thanks
Heya i am for the first time here. I found this board
and I find It really useful & it helped me out much. I hope
to give something back and aid others like you helped me.
Hello mates, nice post and nice arguments commented at this place, I am actually enjoying by these.
Hello There. I discovered your weblog using msn. This is an extremely
well written article. I will be sure to bookmark it and come back to read more of your
helpful info. Thanks for the post. I will definitely return.
Definitely believe that which you said. Your favorite reason seemed to be
on the internet the easiest thing to be aware of.
I say to you, I definitely get irked while
people think about worries that they plainly do not know about.
You managed to hit the nail upon the top as well as defined
out the whole thing without having side-effects , people could take a signal.
Will likely be back to get more. Thanks
Exactly what I was searching for, thanks for putting up.
First off I want to say superb blog! I had a quick question that I’d like to ask if you do not mind.
I was interested to find out how you center yourself and clear your thoughts before writing.
I’ve had difficulty clearing my mind in getting my thoughts out there.
I truly do take pleasure in writing but it just seems
like the first 10 to 15 minutes tend to be wasted simply
just trying to figure out how to begin. Any ideas or hints?
Many thanks!
I’d like to find out more? I’d care to find out some additional information.