Busta Rhymes & dilly beans. A natural combination, no?
So yeah. Dilly beans. As a native New Yorker, where most of my young-adult time was spent pounding pavement in Manhattan, either uptown by the Met or downtown in Chelsea & the Fashion District, not quite growing my own vegetables/living in a rural area/reading up about canning, I hadn’t a friggin’ clue what the hell a dilly bean was. I’d heard of them, sure, on the internet & blogging circles. But I was totally not sure what exactly they were. Turns out, they’re just preserved green beans! Go figure!
Dilly beans or pickled green beans, are a means of preserving this summer legume. Often flavored with dill, hence the name, they may also contain garlic, Tabasco sauce, and red pepper. Best kept in glass jars for safekeeping over the winter months, they can be served on their own as a snack or alongside a main dish or in salad. While they are made in kitchens all over the United States, they are particularly common in Vermont, where the overabundance of green beans produced during the short summer needs to be preserved for enjoyment during the long winter.
Dilly beans were developed as a commercial product in 1958 by Sonya Hagna and Jacquelyn Park, who made them the subject of a well-known radio advertising campaign.[1]
Ahhh so it’s a VERMONT thing, eh? I see. It just sounds so old-timey to me, I find them sorta fascinating.
Turns out they’re pretty popular. After Tracie, a Facebook fan of Cupcake Rehab, mentioned awhile back that they were her favorite thing to “can” (and also explained what they were, thanks Tracie), I thought they’d be an easy pickling project. Especially since my local grocer was selling fresh green beans for super cheap & my family was asking me for even more pickled items (word to the wise: the pickles are never enough). Even though I went canning crazy last month when my grandma died (that still sucks to write, by the way), practically all my pickles are gone and whatevers left is fought over.

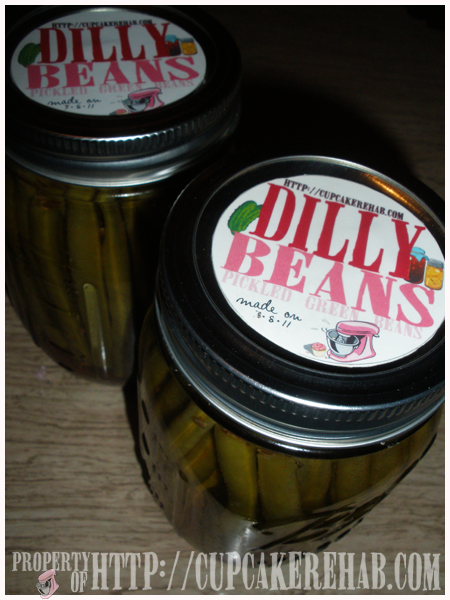 I design/print/make my own labels… I just love them..
…
PICKLED GREEN BEANS AKA “DILLY BEANS” (directly from Food in Jars /adapted from So Easy to Preserve)
Ingredients for gettin’ dilly with it:
- 2 pounds green beans, trimmed to fit your jars
- 1 teaspoon cayenne pepper (more if you like it hot)
- 4 teaspoons dill seed (not dill weed)
- 4 cloves garlic
- 2 ½ cups white vinegar (5%)
- 2 ½ cups water
- ¼ cup pickling salt (use a bit more if you’ve only got Kosher)
Directions on how to get yo’ dilly on:
- Prep your canning pot by inserting a rack to keep your jars off the bottom of the pot, place pint jars in (wide-mouth pints work best here. A 12-ounce jelly jar is also nice, as it’s a bit taller than a standard pint and makes for less trimming) and fill it with water. Bring to a boil to sterilize while you prepare the rest of your ingredients.
- Wash and trim your beans so that they fit in your jar. If you have particularly long beans, your best bet is to cut them in half, although by doing so, you do lose the visual appeal of having all the beans standing at attending.
- Combine vinegar, water and salt in a medium saucepan and bring to a boil. While it’s heating up, pack your beans into the jars, leaving ½ inch headspace (distance between the tops of the beans and the rim of the jar). To each jar, add ¼ to ½ teaspoon cayenne pepper, 1 clove of garlic and 1 teaspoon dill seeds.
- Pour the boiling brine over the beans, making sure to leave that ½ inch headspace. Use a plastic knife to remove air bubbles from jar by running it around the interior of the jar. Wipe the rims and apply the lids (which have been sitting in a small saucepan of water at a mere simmer for at least ten minutes in order to soften the sealing compound) and rings.
- Process for 5 minutes in a boiling water bath (remember that you don’t start timing until the pot has come to a rolling boil).
As she said: “These beans want to hang out for a least two weeks before eating, to thoroughly develop their flavor.” This recipe, as it is written above, makes 4 jars of dilly beans. I did not use wide mouth pints, I used 2 regular pint jars. Why 2? Well I halved the recipe, really because I bought only a pound of beans. I would’ve bought more but I forgot what the recipe said when I went to buy ’em, so I only bought one pound. Why I don’t know, because I clearly could’ve JARRED whatever extra I had. Oh well. I’m still thinking like someone who doesn’t can/jar, i.e. “I don’t want to waste it!” Duh. What an idiot, right? Anyway because these were gifts, or rather “orders”, I did not go crazy with the cayenne. I used just a ¼ teaspoon in each jar and it was too hot for these people! Crazy. If it were for me, I might have used the ½ teaspoon. But remember, these people are lame-o’s who don’t like “hot” stuff. So there we go. Who knew ¼ teaspoon of cayenne was too much? I guess these are some hardcore gangsta spicy dilly “Gettin’ silly wit my 9-milly, what da dilly yo?” beans.
Also, it’s true. Wide-mouth pints would work better. I used regular ones & it kinda sucked cramming them in. Pfft.
 …
…
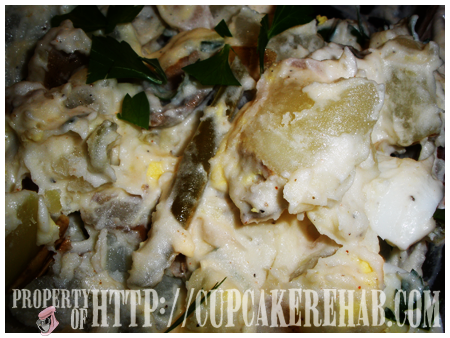
As summer is starting to come to a close, I’m trying to get in all the summer-y things I can. I had a pretty shitty summer, but while it’s still warm I’m trying to hang on to what’s left of it. Potato salad is one of those summertime staples. Every barbecue or picnic has either potato salad, macaroni salad, or both. My grandma made an awesome potato salad. So awesome, everyone who ate it said it was the best ever. Unfortunately, she wrote nothing down. And my mother never noted any of what she put into it, neither did I. It was always a dash of this, a little of that, etc. And as she got older, she made these awesome things less & less, and left the cooking to us; first my mom, then myself. So her recipes belong to the ages, along with her. However, last month’s issue of Bon Appétit has an entire article on canning, and it features a recipe for Dilly Bean Potato Salad. So I thought I’d give it a shot. And while it’s probably not quite as good as Nana’s, it’s something new & different. It’s also pretty damn amazing in it’s own right, to be fair. Maybe a new family recipe?
 Dilly bean sighting!
…
DILLY BEAN POTATO SALAD (from Bon Appétit, August 2011)
Ingredients:
- 2 shallots, halved lengthwise, very thinly sliced (about 1 cup)
- 6 tablespoons red wine vinegar (or more, to taste)
- Kosher salt
- 3 lb. potatoes*
- Freshly ground black pepper
- 1 cup mayonnaise (or more, to taste)
- 1 large pinch smoked paprika
- 3 cups trimmed watercress, purslane or wild arugula, coarsely chopped**
- 1 cup Dilly beans, cut crosswise into 2″ pieces
- 2-3 large hard boiled eggs, peeled, quartered
- 3/4 cup coarsely chopped flat leaf parsley or celery leaves
Directions:
- Place shallots in a small bowl. Stir in the red wine vinegar, and a large pinch of salt; set aside.
- Cook potatoes in a large saucepan of boiling salted water until just tender, about 30 minutes. Drain potatoes well; transfer to a large bowl. Lightly crush potatoes with the back of a large spoon.
- Add shallot-vinegar mixture to hot potatoes and toss to incorporate. Season with salt & pepper.
- Whisk mayonnaise and smoked paprika in a small bowl; add to potatoes and toss to combine. Fold in watercress, beans, add eggs and season to taste with salt, pepper and more vinegar or mayonnaise if desired. Garnish with parsley.
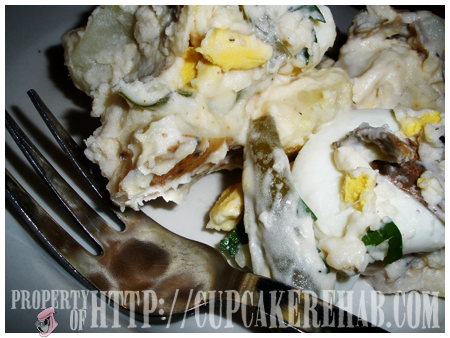 Nana would be proud, second & third servings were requested.
…
This can be made one day ahead of time. Cover and chill, return to room temperature before serving, and stir in extra mayonnaise if it’s too dry. Although the next day nobody needed extra mayo; it seemed to stay nice & creamy. It would also knock it out of the park without the dilly beans; just add a little extra egg.
OH one more thing about the beans; remember what I said about the peaches floating? Dilly beans float too, apparently. I also did not have to trim many of my beans, sure I had to trim some but not a lot. Although now in retrospect, I probably could’ve gotten away with not trimming them at all, because I clearly had a lot of leeway, judging by the bottom of the jars there. I’m really bad at taking photos before I fill the jars, or during the process of filling the jars, etc. I promise I’ll change. I’ll be better. I know people want to see the process. I’ll deliver, my friends, I’ll deliver.
And I swear on my dilly’s that there will be some baked goods soon. In the meantime, why not make some of this for one of those ‘last days of summer’ barbecues?

 I'm Marilla. A 30-something artist, hobby baker, home canning enthusiast, gardener, DIY-er, wife, mommy of a baby boy and dog mom (to another baby boy) from New York.


Did I ever tell you that I get very excited when I see a new recipe posted?….Well, I do.
Thanks Mara 🙂 I’m glad!
Hi there! I know this is kinda off topic but I was wondering which blog platform are
you using for this website? I’m getting tired of WordPress because I’ve had problems with hackers and
I’m looking at alternatives for another platform.
I would be fantastic if you could point me in the direction of
a good platform.
I do consider all of the ideas you have presented in your post.
They are very convincing and will definitely work.
Nonetheless, the posts are very brief for starters.
Could you please extend them a little from subsequent
time? Thank you for the post.
As soon as I detected this website I went on reddit to share some of the love with them.
First of all I want to say wonderful blog! I had
a quick question in which I’d like to ask if you don’t mind.
I was interested to know how you center yourself and clear
your head before writing. I’ve had difficulty clearing my thoughts in getting my thoughts out there.
I truly do enjoy writing but it just seems like the first 10 to 15 minutes are generally lost just trying to figure out how to begin.
Any ideas or tips? Cheers!
My brother recommended I might like this website.
He was totally right. This post truly made my day.
You cann’t imagine simply how much time I had spent for this info!
Thanks!
Hi all, here every person is sharing these familiarity, therefore it’s pleasant to read this blog, and I used to go to see
this blog everyday.
You are so interesting! I do not believe I have read through anything like this
before. So nice to find someone with original thoughts on this issue.
Really.. thank you for starting this up. This website is one thing that is needed on the web, someone with a
bit of originality!
As I website possessor I think the subject material
here is very good, thank you for your efforts.
I’m amazed, I have to admit. Seldom do I come across a blog that’s
both equally educative and amusing, and let me
tell you, you have hit the nail on the head. The issue
is something not enough folks are speaking intelligently about.
I’m very happy that I stumbled across this during my search for something concerning this.
Good post. I learn something new and challenging on sites I stumbleupon on a
daily basis. It’s always useful to read
through content from other writers and practice a little something from other websites.
Aw, this was a very good post. Spending some time and actual effort to produce a really good article… but
what can I say… I procrastinate a whole lot and don’t manage to
get nearly anything done.
I do accept as true with all of the concepts you have presented to your post.
They’re very convincing and will definitely work.
Still, the posts are too short for beginners. Could you please extend them
a little from subsequent time? Thank you for the
post.
First of all I would like to say wonderful blog!
I had a quick question which I’d like to ask if you do not mind.
I was interested to find out how you center yourself and clear your head before writing.
I have had a difficult time clearing my thoughts in getting my ideas out.
I truly do enjoy writing however it just seems like the first 10 to 15 minutes are generally wasted just trying to figure
out how to begin. Any ideas or tips? Many thanks!
It’s a pity you don’t have a donate button! I’d without a
doubt donate to this fantastic blog! I guess for now i’ll settle
for book-marking and adding your RSS feed to my Google account.
I look forward to fresh updates and will share
this site with my Facebook group. Chat soon!
I just like the helpful info you provide on your articles. I will bookmark your blog and test again right here frequently. I’m quite certain I will be informed many new stuff right right here! Best of luck for the following!|
Pretty! This was an incredibly wonderful article.
Many thanks for providing this info.
WOW just what I was searching for. Came here by searching for cupcake rehab
Spot on with this write-up, I really believe that this amazing site
needs a lot more attention. I’ll probably be back again to read
through more, thanks for the information!