Back in June when I posted that DIY tea towel apron tutorial, I got a ton of great feedback. So I thought maybe I’d bring back the DIY thing with another really easy project: painted-handle wooden spoons.
I’ve seen these wooden spoons all over Etsy & Pinterest. Every time I see them I think “I can do that.” I even mentioned doing it to match the apron in that post.
So I finally did it.

![]()
Except these aren’t dipped in rubber like most of the ones you’ll see, they’re just painted in Martha Stewart Crafts™ multi-surface acrylic craft paint. Which, it just so happens, is both “weather-resistant” & non-toxic. They also did not cost $29.00 for a set of three like those other ones for sale on the internet. Instead, it probably cost me less than $5.00 a set, maybe even less than $3.00: The glitter paint is $2.99 & the satin is $1.99 (you could paint a ton of spoons with one bottle!), and a set of the three spoons cost me $1.00.
I think it took me ten minutes to paint three of them. I did one set for myself in pink (of course) and a set for my mother in black. Once I saw how cute they came out, I started experimenting with different colors & styles. You can paint them to match your KitchenAid mixer, to match your Le Creuset, to match your kitchen color scheme or just in your favorite color. Gold/silver/metallic or pearl paints are interesting choices, too!
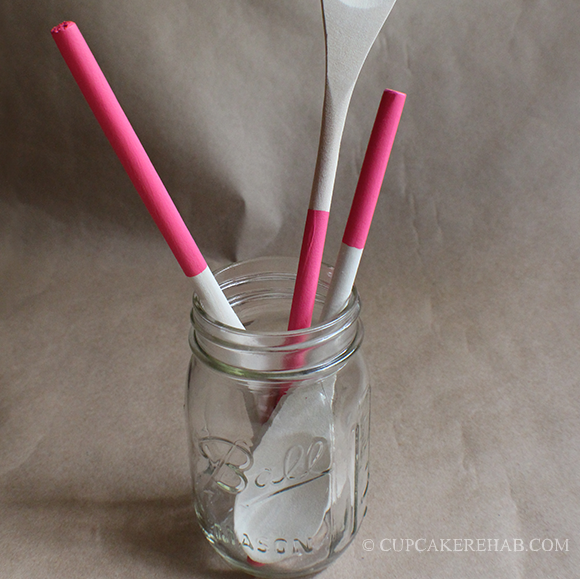
Here they are in pink:
 “pink dahlia”
![]()
Here they are in black:
 “beetle black”
![]()
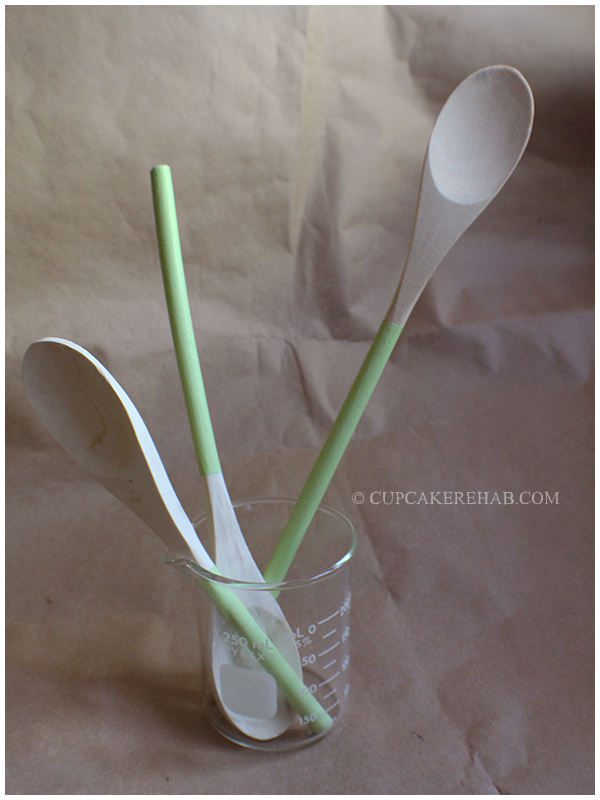
Here they are in light green:
 “scallion”
![]()
And finally… here they are in glittery pink:
 “bubblegum pink”
![]()
Awesome, right? No wonder the dish ran away with the spoon; look at how freakin’ cute the spoons are!
This is what you’ll need:
- Acrylic paint. Mine is useable on wood, fabric, metal & glass among other surfaces, and like I said above- it’s non-toxic. Of course, you’re not painting the part of the spoon that touches the food, but why take a chance? I actually highly recommend the Martha Stewart line; it comes in a zillion colors (the colors I used are named above). I used the satin & glitter finishes, but you can use a gloss, metallic or pearl if you prefer, it makes no difference. All of them are non-toxic & weather resistant.
- A small paintbrush.
- Scotch tape.
- Wooden spoons. I got mine in a 3-pack at the dollar store, you can buy whatever ones you want, or you can freshen up old ones you already have at home (as long as they aren’t recently oiled or varnished).
- A pint jar or drinking glass, deep enough & with a wide enough mouth to accommodate the amount of spoons you’ll be painting without having the painted parts of the handles touch each other or the glass itself.

![]()
This doesn’t even really need a tutorial, it’s pretty much self-explanatory, but here goes nothin’.
The first thing you’re gonna do is gently wash the spoons in hot water with mild dish soap. Let them dry thoroughly. Then, you’re going to tape them where you want the painted section to end. Very easy. I made them all even so that when the spoon parts line up, so does the paint. You can paint as far down as you like, but I’d leave a decent amount of plain wooden space above the spoon part.

![]()
Okay… once they’re taped, get your glass or jar handy & get your workspace ready. Paint your spoon handles with a thin coat of paint, placing them handle side up in the jar or glass as you go. Make sure the painted parts are separate from each other as they dry. After one hour, check to see if they need a second coat (they probably do). Keep the tape on and paint a second coat. Let them dry again in the jar.

![]()
After 2-3 hours you can remove the tape to check if they’re even. If not, just re-tape the spoon a little bit lower and fix your mistakes. Keep the spoons in the jar for 12 hours after they feel dry just to be sure. Let the spoons cure for 21 days (or according to your paint directions) before using or washing them again. If you screw up & get paint on a spot you don’t want it, you can sand it off with some sand paper once it dries.
The glittery ones took about 4-5 coats to look good, but if you paint a solid color underneath then paint the glitter, it’d take less.
And that’s it… you’re done!
If you want a less perfect look, you can definitely paint them without using the tape. Go freehand. Be wild.

![]()
Adorable x 1,000. I just love them.
Another idea: before painting, drill small holes at the end of each handle in the same spot. Sand away any rough patches & then wash/dry/paint the spoons as directed above. After painting, while it’s still wet, poke a toothpick through to make sure they stay clear. When they’re dry, tie them all together with a pretty matching ribbon for a throw-in gift (or stocking stuffer).
![]()
You don’t have to make it solid either- you can do stripes if you’re daring (ha!). Just place the tape all the way up the handle leaving spaces in between for painting. You can do polka dots in another color once the first color is totally dry, too, using a pencil eraser to make the dots. Or you can use pinking shears to cut the tape so yours isn’t a straight line around, but a zig-zag. Tons of ideas!*
Like this “zebra” style version I did (it’s more like an Ikat pattern, really):

![]()
So, how easy is that? Very. Go get on it. And make yourself some fancy spoons!
![]()
*Yoyo also sent me a link for this post at red-brolly.com that shows you how to cover the spoon handles in fabric or Washi tape! It’s a bit more complicated than using just the paint, but it’s worth it judging by the photos.
![]()

 I'm Marilla. A 30-something artist, hobby baker, home canning enthusiast, gardener, DIY-er, wife, mommy of a baby boy and dog mom (to another baby boy) from New York.


Too freakin cool, and super easy!!! Already have the paint, and tape, just need more spoons. This is awesome! The zebra stripe looks pretty wicked 😀
I think the stripe might be my favorite!
That last one with the Zebra print is BADASS!! I think i’m going to try making these this weekend!
Thanks for sharing boo! :] I also pinned this!
THANKS ARI! Yeah I love that zebra one. I want to do a polka dot set next… as if I need more wooden spoons!
I every time spent my half an hour to read this weblog’s articles all
the time along with a cup of coffee.
Ahaa, its fastidious discussion regarding this paragraph here at this webpage,
I have read all that, so now me also commenting here.
hello!,I love your writing very much! proportion we keep
up a correspondence extra about your post on AOL?
I require an expert on this space to unravel my problem.
May be that is you! Having a look ahead to peer you.
Neat blog! Is your theme custom made or did you download it from somewhere?
A theme like yours with a few simple adjustements would really make
my blog jump out. Please let me know where you got your design. Thank you
As soon as I observed this internet site I went on reddit to share some of the love with them.
I every time emailed this weblog post page to all
my friends, since if like to read it then my links will too.
Excellent post. I used to be checking constantly
this blog and I am impressed! Very helpful info particularly the remaining section :
) I handle such information much. I was looking for this
particular information for a very lengthy time. Thanks and good luck.
Have you ever thought about publishing an e-book or guest authoring on other websites?
I have a blog based upon on the same subjects you discuss and would
love to have you share some stories/information. I know my subscribers would enjoy
your work. If you are even remotely interested, feel free to send me
an e-mail.
As I website owner I conceive the content material here is rattling fantastic,
thank you for your efforts.
bookmarked!!, I like your website!
Simply a smiling visitant here to share the love (:, btw outstanding design and style.
Greate pieces. Keep writing such kind of info on your page.
Im really impressed by your site.[X-N-E-W-L-I-N-S-P-I-N-X]Hello there, You’ve performed a great job.
I will definitely digg it and for my part recommend to my friends.
I’m confident they will be benefited from this web site.
Very descriptive blog, I liked that bit. Will there be a part 2?
Hi mates, pleasant article and good arguments commented here, I am actually enjoying by these.
Unquestionably believe that which you stated. Your favorite reason seemed
to be on the net the simplest thing to be aware of.
I say to you, I certainly get annoyed while people consider worries that they
plainly don’t know about. You managed to hit the nail upon the top and also defined out the
whole thing without having side-effects , people can take a signal.
Will likely be back to get more. Thanks
I like this weblog so much, saved to favorites.
Nice response in return of this matter with solid arguments and explaining all concerning that.
I’m gone to tell my little brother, that he
should also pay a quick visit this weblog on regular basis
to get updated from newest news.
Today, I went to the beach with my children. I found a sea
shell and gave it to my 4 year old daughter and said “You can hear the ocean if you put this to your ear.” She placed the shell to her ear and screamed.
There was a hermit crab inside and it pinched her ear. She never wants to go back!
LoL I know this is entirely off topic but I had to tell someone!
I was recommended this website by my cousin. I am not sure whether
this post is written by him as no one else know such detailed about my
problem. You’re wonderful! Thanks!
Pretty nice post. I just stumbled upon your blog and wanted to say that I’ve truly
enjoyed browsing your blog posts. After all I’ll be subscribing to your rss
feed and I hope you write again very soon!
It’s an amazing article for all the online users; they
will get advantage from it I am sure.
Hello! This is my first comment here so I just
wanted to give a quick shout out and say I really
enjoy reading through your articles. Can you
recommend any other blogs/websites/forums that deal with the same topics?
Thank you!
I’m truly enjoying the design and layout of your site.
It’s a very easy on the eyes which makes it much more pleasant for me to
come here and visit more often. Did you hire out a developer to create your theme?
Excellent work!
For most up-to-date information you have to visit web
and on web I found this site as a most excellent web site for hottest updates.
What’s up, after reading this remarkable piece of writing i am
too delighted to share my knowledge here with colleagues.
I’m really enjoying the design and layout of
your site. It’s a very easy on the eyes which makes it much more enjoyable for me to
come here and visit more often. Did you hire out a designer to create your theme?
Excellent work!