For quite some time now, people have been asking me to do tutorials on frosting. Specifically piping and the use of pastry bags, but I’ve gotten requests for things like tinting frosting, mixing frosting, and basic frosting application as well. In no way do I think I’m the best at this, nor am I professionally trained. But nonetheless, the public asked, and I’ll deliver. And since I’ve learned a lot since the start of this blog 2.5 years ago, and I’ve made some mistakes, I decided to use some of my own cupcake pictures as examples for this first post. This is all things that I have learned through trial and error and I am most certainly not Julia Child… but if it helps someone else, then how bad could I be for posting it? I thought it would be best to start really simple- with some common sense (or what I think to be common sense anyway) ideas for making your cupcakes look the best they can. Before you can frost, or make frosting, you should have a general idea of some basic concepts that can really help you out along the way. I know some of you may be past this point, and ready for the piping tutorial, and I’m sorry to keep you waiting… but you’ve gotta crawl before you can walk and some people have asked for this. So stick with me and the next tutorial will be more relevant to you.
First off, let’s start with basic chemistry. Baking has a lot to do with science. Even if you’re a casual baker who just likes making cupcakes or cakes for fun and you don’t take it seriously, you’ll need to know certain things. If you are making a frosting, for example a “buttercream” (which usually isn’t a real buttercream, just a butter frosting), and it’s too stiff, you add more liquid. If your frosting is too thin, you add more sugar. In the rare event that doesn’t help, an extra pat of butter or spoonful of shortening will do the job as well. Also, depending on the weather, you might want to incorporate shortening into your frostings anyway. It adds more stability and substance in places of high humidity or heat, so your frostings don’t drip or wilt. Another thing to remember is certain flavorings, or things you can use as flavorings, can cause your frosting to separate. Coffee is a big culprit with this. I suggest using a coffee extract instead, but if you’re dead set on using regular coffee (which is totally possible, don’t get me wrong), make sure you add some shortening as an added bonding agent and you frost your cake/cupcake immediately to avoid the frosting “breaking” on you.


Sources: top, almond cupcakes, bottom, cream soda toffee cupcakes
..
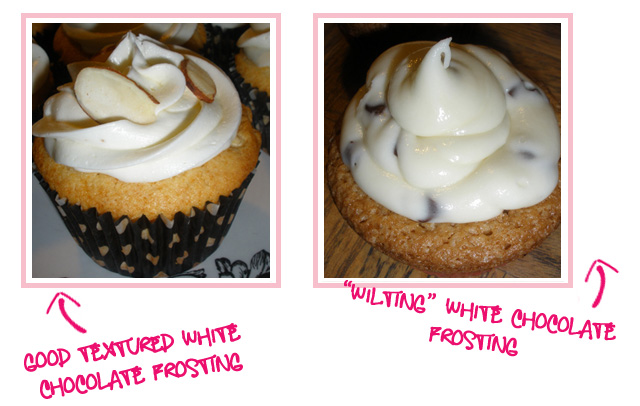
Same goes for white chocolate. If you melt white chocolate to use in your frosting, you will absolutely have to add shortening to it. White chocolate is notorious for being really soft and making the frosting wilt. For example:
 Sources: White chocolate almond cupcakes, left and Dylan Lauren’s cupcakes, right
…
KEEP IN MIND: BUTTERCREAM IS NOT AN EXACT SCIENCE. Unlike cake, or cupcakes, or baked items, there is no definitive way of doing it. It does not have to contain an equal amount or specific amount of anything in it. You don’t really even need a recipe. As long as the finished product is stiff enough to be frosting, isn’t runny or isn’t too thick… then you’re good. If you’re making a recipe for buttercream, and it comes out too runny, add more sugar! If it’s too thick, add more milk! I don’t think I’ve used a recipe in years. I just wing it, and as long as it comes out pipeable and edible, it’s all gravy. Or… frosting?
I always test my frosting by picking some up with a spoon and plopping it on a piece of paper towel. If it holds it’s shape, it’s probably good to go. If not, it needs more sugar/shortening, and if it’s too thick to come off the spoon no matter how hard you shake… then you should add a bit more milk (or vanilla extract). You want your frosting stiff & thick, but not brick-like. The thicker your buttercream is from sugar, the harder it’s going to get when left out. You know that hard shell buttercream sometimes develops? Yeah, like that.
…
 (The concept is the same with a cream cheese frosting. It’s always going to be part cream cheese, obviously, but I like to add some butter too. So I use about ¼ stick of butter and 4-8 oz cream cheese, depending how many cupcakes I’m frosting or how big the cake is. Then I just add the sugar as needed, and add some milk or vanilla extract to help thin it out a bit. In this case, the cream cheese adds what the shortening would- a thicker creamier base that helps the frosting get stiffer.)
…
A lot of people have problems with wilting frosting even if they follow all those directions to a tee. The frosting was just fine before it was put on the cake/cupcakes, but then you frost them and it just melts, or wilts, or slides off. In that case, I would say it’s most likely because your cupcakes aren’t cool enough when you frost them. This is HUGELY IMPORTANT. Many of us, myself included sometimes, as evidenced above, are too impatient to wait long enough. So we jump in, pipe our pretty little piles of frosting on top, and by the time we get to the fourth cupcake… the rest of the cupcakes have flattened, mushed down, drippy, lop-sided frosting. This is easily remedied. No, not once it’s done. But before it’s done. I know we’re all busy, and that most of you have kids running around, or pets, or husbands or boyfriends poking fingers in your batter bowls and frosting bags (wow that sounded dirty!), but you have to wait. The cupcakes (or cake) have to be totally and completely cool… not just to the touch. The internal temperature of the cake takes a much longer time to cool, and if the inside is still hot (or even slightly warmer), then for sure that frosting is going to melt. What I do (especially if I’m in a hurry, otherwise I try and avoid doing it and practice my patience instead) is I let them cool for 15 – 20 minutes, 5 – 10 in the pan usually and then another 10 on a rack, then I pop them into the freezer for like 5 – 10 minutes at the most. Then when I take them out, the tops are very cool and I’m more certain the internal temp is room temperature if not slightly cooler. Then I can frost them quicker. This is especially helpful in the warm weather when no matter what I do short of holding them in front of the A/C vents, my cupcakes do not cool down quick enough.
If you do ALL these things and your frosting STILL isn’t pipable… well, then the cupcake gods are against you and you should just stick to making Jello because I don’t know what to tell you.
…
(I’m not going to get into meringues, 7-minute frostings and the like in this post… but if anyone would like a post on them, e·mail me.)
..
Next thing I’m going to discuss is color theory. I know, you’re all thinking “WHAT!?” but honestly, it’s important. So many times I see people make cupcakes and they try a dual colored frosting, and they pick colors that combine to make… a mud color. And when frosting gets soft, and the colors start to bleed slightly… you want to make sure you have two colors that compliment one another at best and at worst look decent and not muddy. Nobody wants to eat a cupcake with a pile of mushy frosting that looks like a non-descript mud colored lump. Maybe because I’m an artist first, baker second, to me this is something that comes naturally. So I’m going to show you a tool to help you with this, and that tool is… the color wheel. TA DA!
 (Thanks to seanmarcellus.com for the color wheel image)
…
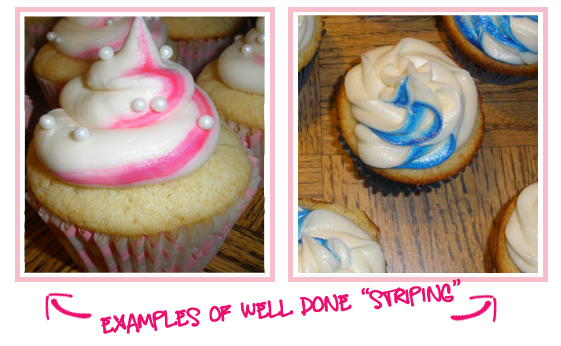
Okay, so what you should realize is that there are primary colors, secondary colors (which I’m sure you all know), tertiary colors, and complimentary colors which for our purposes (frosting) are NOT always complimentary. The colors that are OPPOSITE one another on the wheel, i.e. purple & yellow, blue & orange, etc… those colors compliment each other well. That is, when put next to one another, like in a painting, in decorating a room, in clothing, etc. When used in a frosting…it would look great too, however you can’t predict exactly how your frosting is going to take it, for example, you create a striped or two tone frosting, using purple and yellow, and the edges of the colors blend together… well, you’re going to get a brown, or a muddy color. Ick. That said, tinting a cupcake orange and using a blue frosting on it would be fantastic, or using two separate pastry bags filled with the colors separately, and you frost one on top of the other after the first sets. I’d just tend to stick with plain white frosting if you’re going to stripe it, and use a color for the stripes or second tone. Or, use colors that if they do blend together a bit, it looks good; for example pink & red, orange & yellow, blue & green, purple & black, etc. Otherwise, unless you’re really good, you run the risk of the colors mushing together a bit and ruining the brightness and the striking effect you’re trying to create.
 Sources: left, pink zebra girly cakes, right, Obama cakes
 Source: Anti-Valentine’s day cupcakes
…
Another way to avoid the running or blending of the colors is to do two separate frosting colors, and pipe them on separately, or do a half-n-half frosting like CB at I ♥ Cuppycakes did. I’ll leave the explaining of that to her since I already linked to her *wink*
I hope this helps some of you. My next tutorial will be piping frosting/frosting cupcakes, both with a pastry bag and without. It will probably be up in about a week, maybe two weeks from now. Here’s a list of basics I suggest you invest in:
- 16″ pastry bag
 – I recommend this size because it holds enough frosting for at least 24 cupcakes without having to refill
 - disposable pastry bags – definitely needed if you’re using colored frostings, they’ll dye your polyester reusable bags something fierce, you can also use these instead of reusable bags, despite the horrible effect they probably have on the environment, it saves time: instead of washing ’em, you toss ’em
- large coupler – this is what you use to attach the tips to the bags.. duh… although when using disposable bags, this isn’t needed
- offset spatula – important for frosting cupcakes that you don’t want to pipe, or for creating smooth tops on them, like this
- 1A tip (large round) – this tip makes the frosting look like these examples: one – two – three (also it’s good for piping on frosting before you spread it out with an offset spatula, like this)
- 1M tip / #2110 (large star) – this tip makes the frosting look like these examples: one – two – three
Again, I use all Wilton products. These things are also available in other brands, but that’s up to you. I think you should always invest in something that’s built to last, especially if you’re going to be using it a lot and wearing it out, so I don’t suggest going cheapo with this. However, it’s totally up to you what brand you choose to buy or what you want to pay.
Is there anything you’d like me to have a tutorial on? Let me know either in the comments or via e·mail and I’ll certainly take it into consideration!

 I'm Marilla. A 30-something artist, hobby baker, home canning enthusiast, gardener, DIY-er, wife, mommy of a baby boy and dog mom (to another baby boy) from New York.


Very Helpful!….Hmmm webcam would be awesome for the piping segment!
I think I’m going to go with just sequenced photos, it’s easier. I can set the timer & just go.
Besides I hate my voice & don’t want it on a video all over the internet LOL
this post is so awesome! it is so helpful and so informative. thank you soo much! can’t wait for your piping pictures.
Thanks Chloe, I’m glad you got something out of it 😀
Very much appreciated by beginner bakers!! Thanks!
Anytime! Part two will be more interesting, I promise 🙂
I loved this post I needed that I love to bake for fun but its when I get most creative
Good I’m glad!!
I actually really needed this! My daughter is turning three in May, and I am terrrrrrrible at frosting cupcakes. Thank you!
You’re welcome! Part two is coming, I was going to start it last night, but I had a slight setback… I’ll get cracking on it ASAP!
Holy cow! That’s a lot of info on perfecting your frosting. But, in my opinion, it’s worth it. I’ve seen some pretty pathetic cupcakes at my kid’s fund raising events. I secretly judge their parents if their frosting is flat 😛
Haha… you haven’t seen anything yet. Wait until part two!!
this was my biggest probleme thank you soo much i will definitely try all of your suggestions!
You’re welcome, I hope it helps!
Thank you for your words of wisdom. I have been baking since I was a kids but now I want to step it up and do some cakes and cupcakes for friends and family, your blog is wonderful, don’t stop!
You’re so welcome, Tamika! I’m glad you like it. I won’t be stopping any time soon, don’t worry! 😀
I know this post isn’t recent… but you’ve officially been bookmarked. LOVE your advice and can’t wait to read more. <3<3 Thank you!
You are totally welcome Lily! I’m glad my rambling & trial/error mistakes & successes can come in handy! 😉
My frosting just withered and slid off my cupcake 🙁
Googled why and found this!
Sooooo wish I had googled first, back to the whisking bowl xxx
Aww Ellen 🙁
I’ve been there! But on the plus side, I’m glad you found it, even if it might have been a little late… ;D
Some really interesting information, well written and broadly user pleasant.
I have been exploring for a little bit for any high quality articles or blog
posts on this sort of area . Exploring in Yahoo I ultimately stumbled upon this web site.
Studying this info So i am glad to exhibit that I have a very good uncanny feeling I found out exactly what I needed.
I so much certainly will make certain to do not fail to remember this site
and provides it a glance on a continuing basis.
I’m no longer positive the place you’re getting your information, but good topic.
I must spend a while studying much more or figuring out more.
Thank you for great information I was searching for this info for my mission.
I have been exploring for a little bit for any high-quality articles or weblog posts on this kind of house .
Exploring in Yahoo I eventually stumbled upon this site.
Studying this information So i am happy to convey that I
have a very excellent uncanny feeling I discovered just what I needed.
I such a lot surely will make certain to
do not omit this site and provides it a glance on a constant
basis.
I every time emailed this weblog post page to all my contacts, since if like
to read it then my contacts will too.
Great post. I was checking constantly this blog and I am impressed!
Extremely useful information particularly the last part 🙂 I care for such info a
lot. I was looking for this certain information for a very long time.
Thank you and good luck.
Good web site you have got here.. It’s hard to find good quality writing like yours nowadays.
I truly appreciate people like you! Take care!!
Some genuinely interesting info, well written and broadly speaking user
friendly.
Appreciating the commitment you put into your site and in depth information you offer.
It’s nice to come across a blog every once in a while that isn’t the
same out of date rehashed material. Great read! I’ve saved your site and I’m adding your RSS feeds to my Google account.
Yes! Finally something about ig.
Highly energetic article, I liked that a lot. Will there be a part 2?
It’s awesome to visit this web site and reading the views of all friends
on the topic of this article, while I am also zealous of getting knowledge.
Today, I went to the beachfront with my kids. I found a sea shell and gave
it to my 4 year old daughter and said “You can hear the ocean if you put this to your ear.” She placed
the shell to her ear and screamed. There was a hermit crab
inside and it pinched her ear. She never wants to go back!
LoL I know this is completely off topic but I had to
tell someone!
It’s hard to come by experienced people for this topic, however, you seem like you know what you’re talking about!
Thanks
Wow, marvelous weblog format! How lengthy have you been running a blog for?
you made blogging glance easy. The whole glance of your website is wonderful,
as smartly as the content material!
I read this post completely about the comparison of most up-to-date and previous technologies, it’s
remarkable article.
Hi my friend! I want to say that this article
is amazing, great written and come with approximately all important infos.
I would like to peer extra posts like this .
Nice replies in return of this issue with firm arguments and
describing all concerning that.
I know this website gives quality dependent content and other information, is there any other web site which gives these information in quality?
Simply wish to say your article is as surprising.
The clarity on your post is just nice and that i can think you’re an expert in this subject.
Fine together with your permission allow me to clutch your feed to keep up to date with coming near near post.
Thank you a million and please continue the gratifying work.
I visited several web pages but the audio quality
for audio songs existing at this web page is truly superb.
This is my first time pay a quick visit at here and i am in fact happy to read everthing at alone place.
I’ve been surfing online more than 3 hours nowadays, but I by
no means found any attention-grabbing article like yours.
It’s pretty value sufficient for me. Personally, if all webmasters and bloggers made excellent content as
you did, the web will likely be a lot more helpful than ever before.